2.1.3 REST Certificate Added
The REST Certificate Added event sends a notification to a REST web service when a certificate is added to the system. You must configure the Certificate Authorities workflow for each certificate policy for which you want to trigger the notification; see section 2.1.3.4, Setting up your certificate policies.
The REST Certificate Added notification can use the following mapping files:
-
RESTCertificateAddedMyID.xml – specifically designed to send a notification to another MyID CMS system. Provides information on the certificate so that the target MyID CMS system can import it.
See section 2.1.3.5, Setting up an external MyID CMS system to receive notifications.
-
RESTCertificateAdded.xml – a generic notification that provides as much information about the certificate as possible so that you can extract the information you need on your own system.
You can configure multiple notifications of this type, which allows you to send notifications from different certificate policies to different external systems.
2.1.3.1 Endpoint
The endpoint is determined by the mapping file you use.
-
For the RESTCertificateAddedMyID.xml mapping file:
POST /api/Certificates/import
This is a MyID Core API endpoint. For more information about this endpoint, see the Importing certificates section in the MyID Core API guide. Note, however, that while the endpoint can handle importing either X.509 files (containing certificates) and PKCS#12 files (containing certificates and private keys), in this case the notifications contain only X.509 certificate data, and do not contain private keys.
-
For the RESTCertificateAdded.xml mapping file:
POST /certificates/{Certificate.ObjectID}/added
This is a generic endpoint that you can create on your own system to consume the notification; alternatively, you can copy this mapping file and edit it to create a mapping file that uses an endpoint of your own choosing. See section 2.2, Creating a mapping file.
2.1.3.2 Data
The data is determined by the mapping file you use.
When you use the RESTCertificateAddedMyID.xml mapping file, the data is tailored to providing information to another MyID CMS system to allow it to handle the certificate. If you set up your certificate policy in the Certificate Authorities workflow to specify the object ID of a certificate policy on the target system, the target MyID CMS system imports the certificate using this certificate policy (usually the Unmanaged Imported policy).
When you use the RESTCertificateAdded.xml mapping file, MyID sends as much information as possible about the certificate so that you can process the information that is important to your own target system.
The data sent when using the RESTCertificateAdded.xml mapping file is:
{
  "id": "xxxxxxxx-xxxx-xxxx-xxxx-xxxxxxxxxxxx",
  "target": {
    "id": "xxxxxxxx-xxxx-xxxx-xxxx-xxxxxxxxxxxx",
    "name": "John Smith"
  },
  "automaticRenewal": "0 | 1",
  "cAPath": "Certificates.CAPath",
  "certPolicy": "Certificates.CertPolicy",
  "certSerialNo": "Certificates.CertSerialNo",
  "status": "1",
  "certStatusDescription": "Certificates.CertStatusDescription",
  "collected": "1",
  "containerName": "Certificates.ContainerName",
  "number": "Certificates.ID",
  "imported": "Certificates.Imported",
  "issuance": {
    "completeTime": "yyyy-MM-dd HH:mm:ss",
    "startTime": "yyyy-MM-dd HH:mm:ss"
  },
  "issuerDN": "Certificates.IssuerDN",
  "keyArchivalDisplayName": "Certificates.KeyArchivalDisplayName",
  "keyArchived": "Certificates.KeyArchived",
  "expiryDate": "Certificates.NotAfter",
  "dateIssued": "Certificates.NotBefore",
  "renewalDate": "yyyy-mm-dd",
  "requestID": "Certificates.RequestID",
  "response": "Certificates.Response",
  "statusMapping": {
    "id": "1"
  },
  "userDN": "Certificates.UserDN",
  "userSid": "Certificates.UserSID",
}
This is the based on the data that you can retrieve for a certificate using the following endpoint in the MyID Core API:
GET /api/Certificates/{id}
2.1.3.3 Expected response
A 200 OK response in the event of success.
2.1.3.4 Setting up your certificate policies
If you have set up an external system using the REST Certificate Added notification, the following additional options appear when editing a certificate policy in the Certificate Authorities workflow:
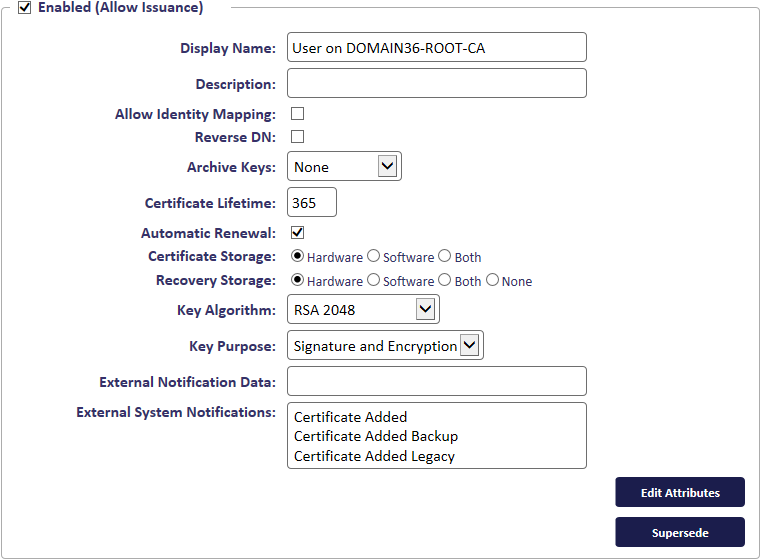
-
External Notification Data – type the object ID of the certificate policy on the target MyID CMS system under which you want to import the certificate.
This is used when sending a notification to another MyID CMS system. You can find the object ID of the certificate policy in the database of the target MyID CMS system; typically, you want to use the Unmanaged Imported certificate policy. Run the following SQL against the MyID database:
select ObjectID from CertPolicies where Template='Unmanaged Imported'
-
External System Notifications – select the notifications you want to trigger when a certificate using this policy is added to the system. The box lists all of the external systems you have set up with a Notification type of Rest Certificate Added. If you want to trigger the notification to multiple systems, hold CTRL or SHIFT and click to select multiple items in the list.
2.1.3.5 Setting up an external MyID CMS system to receive notifications
You can connect your primary MyID CMS system to an external MyID CMS system through the REST Certificate Added notifications so that every time you add a certificate to the primary MyID CMS system, it sends a notification to the external MyID CMS system containing the PKCS #7 certificate data so that it can import the certificate.
This connection is made through the MyID Core API, using the following endpoint:
POST /api/Certificates/import
To configure your external MyID CMS system to receive notifications, you must set it up for server-to-server OAuth2 authentication; see the Server-to-server authentication section in the MyID Core API guide. Make sure you grant the user account permissions to the /api/Certificates/import endpoint; see the Accessing the API features section.
Once you have set up the external MyID CMS system for server-to-server authentication, you can set up the external system in your primary MyID CMS system so that your primary MyID CMS system can authenticate to the external system:
-
From the Configuration category, select External Systems.
You can also launch this workflow from the Connections and Notifications section of the More category in the MyID Operator Client. See the Using Connections and Notifications workflows section in the MyID Operator Client guide for details.
-
Click New.
-
From the Listener Type drop-down list, select RESTService.
-
Complete the following details:
-
Name – Type a name for your REST notification external system.
-
Description – Type a description for the external system.
-
Enabled – Select this option to enable the notification.
-
Mapping File – Select RESTCertificateAddedMyID.xml from the drop-down list.
-
Notification – Select REST Certificate Added from the drop-down list.
-
API Location – Type the base URL of the MyID Core API on the external MyID CMS system.
For example:
https://external.example.com/rest.core
-
-
Provide the server-to-server authentication details you configured on the external MyID CMS system.
-
OAuth Token Endpoint – Type the URL of the token endpoint on the MyID web.oauth2 web service on the external MyID CMS system.
For example:
https://external.example.com/web.oauth2/connect/token
-
Client ID – Type the client ID that you created when you set up server-to-server authentication on the external MyID CMS system.
For example:
myid.mysystem
-
Requested Scopes – Provide the scope you configured when you set up server-to-server authentication.
Typically, this is:
myid.rest.basic
-
Client Secret – Type the client secret you created when you set up server-to-server authentication.
-
Confirm Client Secret – Type the client secret again to confirm it.
Note: You do not have to provide a Bearer token; MyID CMS requests the bearer token automatically using the above authentication details.
-
-
Click Save.